The diary’s and accounts of Lt Karsten, WO2 JA Dyer and Cpl Frank Wallbank.
On 1 November at 20.30, the 3rd Hussars left El Alamein by the coastal road heading west, then, after driving for a few kilometres, turning south-west along Diamond Track, which led down to the front.
On account of the heavy losses during Operation Lightfoot, it was a seriously depleted regiment that moved into the field:
‘A’ Squadron consisted of only six tanks; ‘B’ Squadron was in a slightly better condition with 11 tanks, while ‘C’ Squadron was almost up to full strength with 15 tanks. The Regimental staff, on which Henrik now served as intelligence officer had four tanks and various wheeled vehicles including Henrik’s scout car at their disposal.
The Regiment had lost so many officers in Lightfoot that two out of three Squadrons and most divisions were under the command of officers who had quite recently joined the Regiment and in several cases had only a little experience of tanks.
The much depleted ‘A’ Squadron replaced the intelligence and reconnaissance platoon, which was unfit for combat on account of losses and equipment problems.
At 01.05 – after seven hours of air attacks on Tel el Aqqaqir and Sidi Abdel Rahman and a four-and-a-half-hour-long artillery barrage, in the course of which 360 guns fired 15,000 shells at the German and Italian positions over a front of just under 4,000 metres, the two infantry brigades went on the attack. The infantry advanced behind covering fire which slowly moved forward over the enemy positions before them. The attack went largely as planned, and by about 04.00 the infantry had fought their way forward to the Grafton Line.
The 9th Armoured Brigade followed close on the infantry on the three 15-metre paths the sappers had cleared through the minefields and marked with blue lights on both sides. The 3rd Hussars were headed by 2nd Lt Henrik Karsten, who had been appointed Regimental navigator, and Captain Richard Heseltine, who led a platoon (three tanks) from ‘A’ Squadron and on the left the soft skin vehicles of A Company 14th Foresters on the right. ‘A’ Squadron led as reconnaissance, ‘C’ Squadron, RHQ, Squadron, the remainder of ‘A’ Squadron followed by the 2nd New Zealand Divisional Cavalry.
The Regiment moved in a dual column with tanks and other tracked vehicles on the left and wheeled vehicles on the right. Radio silence had been ordered, and the darkness, the smoke from the explosions and the dust thrown up by the tracked vehicles made it difficult to find one’s bearings and maintain contact between the vehicles. This must have been one of the worst night marches ever made.
The whole Regimental Group was moving on a six-yard wide track with mines on either side. Things were not improved by the fact that the compasses in some of the Regiment’s new Sherman tanks had been wrongly mounted and that, even in the cases where the compass in fact was in order, there had rarely been time to show the crews how to use them.
Soon after the start of the attack, the 3rd Hussars came under heavy fire from enemy guns and mortars. Especially hard hit were the infantry company and the anti-tank platoon that were to have supported the 3rd Hussars in their break out from the Grafton Line.
All of ‘A’ Company 14 Foresters soft skin vehicles were knocked out and all their Offices less the Commanding Officer were injured or killed. When the tanks attempted to manoeuvre around the wrecked and burning trucks, several of them collided or ran onto mines.
The explosions blew out the blue marker lights and overturned their stands that had been put up by the Provost to mark the lanes and Lt Karsten and Capt Heseltine had to leave their vehicles in order to move around on foot in the darkness and the increasingly dense fog of dust and smoke in order to try to find the way through the minefield.
While they were working in this way, Heseltine’s tank was hit by a shell that blew up the engine’s air filters and doubtless would have killed him if he had still been standing head and shoulders above the hatch in the turret in an effort to make out what lay ahead.
Richard Heseltine later wrote: “Tanks and trucks ran on to mines, and every single infantryman and gunner was eliminated: not one survived to get through. How Henry and I did is an absolute miracle.”
Lt Karsten and Capt Heseltine were able in time to find their way through the minefield, and at about 02.30 they continued to move forward through darkness and explosions – only, when they had driven some way, to discover that no one was following them. They had to go back and look for their comrades, and when they had re-established contact with the main force the advance continued, and in time the 3rd Hussars got out of the minefield.
Damage from mine and shelling had caused the following tanks to fall out:
‘A’ Squadron, 2 Crusaders, ‘B’ Squadron, 1 Sherman and ‘C’ Squadron, 2 Sherman’s and 5 Grants.
This left ‘A’ almost halved, ‘B’ almost intact and ‘C’ Squadron badly disorganised and depleted.
Meanwhile, landmines still constituted a serious danger, and the intention was for sappers equipped with mine detectors to precede the tanks all the way from the minefield to Grafton. A group of minesweepers typically consisted of about twenty men, some three or four of whom operated the mine detectors while the rest removed the mines, marked the cleared pathways etc, but when Heseltine’s reconnaissance Troop reached the rendezvous, there was only one single surviving sapper.
For a time, he preceded Heseltine’s tank with his minesweeper, but it was slow progress, and Col Farquhar had given clear orders that the 3rd Hussars were to be at Grafton by 05.00 at the latest in order to start the attack through the enemy gun positions at 05.45 while it was still dark. Heseltine took the chance and decided to lead the regiment forward without waiting for the mine-clearing operation to be completed. It was a risky decision, but by 04.50 the 3rd Hussars had reached Grafton.
In the meantime, the Warwickshire Yeomanry had been held up and had not reached their objective. This made the Brigadier (Brigadier J Currie DSO) postpone the Brigade advance from Grafton from 0550 to 0615 hours. As ‘C’ Squadron was badly disorganised the Colonel decided they were in no fit state to lead the final advance and taking the advantage of the extra half hour, ordered ‘B’ Squadron to move up into position behind the 3 Crusaders of ‘A’.
The original plan to have ‘A’ and ‘B’ Squadrons was not possible, owing to their casualties during the approach march. Our mission was now to go one and three-quarter miles on a bearing of 305 degrees, to cut the Rahman Track and get through the enemy gun line and hold the gap open for X Corps. We had been promised an artillery barrage, moving forward at 100 yards every three minutes.
Lieutenant Colonel Farquhar’s adjutant had been ill for days with hepatitis, and shortly before the Regiment had left the starting line he had collapsed. As he had completed his task as navigator, Lt Karsten was appointed assistant adjutant and assigned a seat in Farquhar’s tank – not a comfortable seat for him as he was 194 cm tall.
Lt Karsten wrote in his diary:
“Went with CO Tank as Adjutant away. 0700 very heavy fighting. God knows how I got out alive. I was expecting to be blown sky-high any second. All-day shelled. Heavy losses. Very few tanks left. Moved back slowly. Lots of prisoners. We held the gap. Did our job. Night simply heaven. Had no kit, in scout car. Slept just as I was. And well”.
At 05.20, Lt Col Farquhar was informed by brigade headquarters that “the Meet of the Grafton Hounds” had been postponed for half an hour, from 05.45 to 06.15 because the other two armoured regiments had been delayed. As the attack had been postponed from 31 October to 1 November, the waning moon had necessitated starting at 01.00 instead of midnight, which had given an hour less to reach Grafton before sunrise.
This had nevertheless been achieved, but the new delay meant that the tanks now had to carry out the attack in growing daylight. An attack by tanks without infantry support on a belt of anti-tank guns in well-prepared positions was an almost suicidal undertaking, but there was no infantry available, and “the door was to be held open” at – literally – any price.
At 06.15 – half an hour before dawn and with a visibility of about 100 yards – Lieutenant Colonel Farquhar gave the 23 tanks remaining from the original 35 orders to attack.
The Royal Wiltshire Yeomanry attacked on the left of the 3rd Hussars, but the Warwickshire Yeomanry had not arrived. In addition, the creeping artillery barrage, which at a speed of 30 metres a minute was to have prepared the way for the attack, failed to materialize.
However, things nevertheless proceeded well for the first 1200 yards, and the 3rd Hussars took a large number of prisoners whom they simply had to direct further back, where others would have to attend to them. Then, as just enough to see 100 yards faintly, ‘B’ Squadron moved 2 troops up, Lt Kelly on the left and Lt Dorman on the right, SHQ in the centre and just to their rear, Lt Hill-Lowe’s troop. The pace felt agonizingly slow, but we were waiting for the barrage in vain, for some reason it never materialized.
Moving forward slowly in the waning moonlight seemed to magnify a hundred times the size of a Sherman or Grant, so it felt hard to believe that every German anti-tank gun was not trained on your own personal tank. Prisoners were streaming in and a lot of Browning was being fired at anything that looked suspicious as much to reassure the crews as to fright the Boche. All went well and then dawn broke, with ‘A’ Squadron almost on the Rehman Track and ‘B’ Squadron spread out about 400 yards behind.
When the attacking forces reached the Rahman road, however, it had become so light that the tanks were outlined in silhouette against the eastern sky and constituted perfect targets for the enemy anti-tank guns, which now opened fire at very close range. The German and Italian artillerymen had allowed the first tanks to pass and only opened fire when they were right amongst them.
The 3rd Hussars lost a dozen or so tanks during the first hour of battle, and when radio communication failed, Lieutenant Colonel Farquhar had for a time only five tanks at his disposal, the commanders of which received their orders by Farquhar and another officer walking back and forth on the battlefield in order personally to direct the battle.
Almost at once, the desert seemed to be a mass of gun pits, we were right in the middle of the anti-tank line. Lt Dorman on the right was about 10 yards away from a cluster of four dug in 50mm anti-tank guns. He and his Troop were shooting them up at point-blank range and making an excellent job of it, all four guns were knocked out with most of their crews with them with the few survivors only too happy to become prisoners. There was no one who took to look after them, so a few bursts of Browning behind them from the Squadron Leader ushered them in the right direction. Almost simultaneously Lt Kenny and his Troop were doing the same thing to another four 50mms about 300 yards to the left, with the same results. These were the forward screen of Light anti-tank guns and as daylight improved so did the accuracy of the Germans 88s.
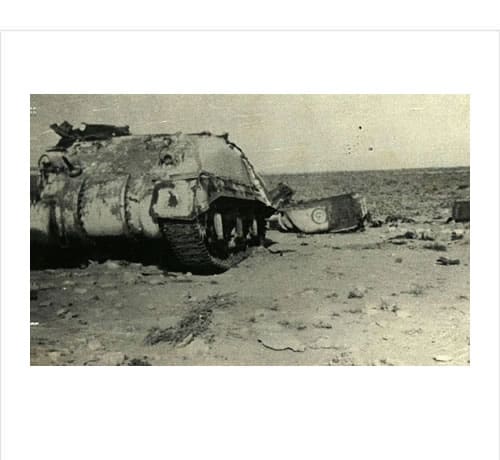
Very quickly two of Lt Dorman’s Troop were on fire and one of Lt Kenny’s. The Squadron Leader, who was in the middle, saw another nest of guns beyond and in front of Lt Dorman’s Troop, moving as fast as they could go, SHQ engaged them with Browning’s on the move which seemed to keep them quiet. Lt Kenny in his remaining tank and Lt Hill-Lowe were told to follow on and swing slightly right to ensure the guns had been destroyed, but Lt Kenny came up on the air to say he was hit and on fire and could not comply with the order.
His tank blew up shortly after and he and his crew were never seen again. Lt Dorman was the only tank left in his Troop received a direct hit by HE. This left 3 tanks in SHQ of which one was a Crusader which was almost immediately knocked out and Lt Hill-Lowe’s Troop of 3 tanks still in action. It was no use stopping now as the only hope was to keep going and pray for the best. This we did, accounting for one 88mm which was facing the wrong way. All this time Germans and Italians kept bobbing out of holes to surrender and there was nothing we could do about it as we were much too busy engaging the enemy. It was a donkey’s gallop in the end, short and sharp. The Squadron Leaders tank was hit and brewed up, which left four tanks in action, one whose gun was hit and useless.
The 1st Armoured Division finally arrived at about ten o’clock. The remnants of the 3rd Hussars helped their newly arrived colleagues to repulse a German counterattack, destroying five German tanks along with an 88 mm gun. In addition, there were at least 35 enemy guns which the regiment had destroyed during the attack that morning, in several cases by driving across the positions and crushing both guns and men. “An adequate bag,” as Farquhar wrote in his report on the battle, “and we felt quite satisfied.”
Trucks arrived about midday bringing provisions, ammunition and petrol, and the 3rd Hussars, which were now sufficiently regrouped for Farquhar to have control of all eight surviving tanks, moved a little way back to re-equip and allow the men to rest.
Meanwhile, Farquhar met the commander of the 9th Armoured Brigade, who ordered him to group his eight tanks into a squadron that was temporary to be placed under the command of the Warwickshire Yeomanry, who had just reached the position. This improvised force joined battle again late in the day and destroyed a German tank and a couple of 88 mm guns.
When darkness began to fall, the remains of the 3rd Hussars withdrew a couple of kilometres to strike camp for the night. A five-minute-long and very precise enemy artillery attack brought “a particularly eventful day to a fitting conclusion,” wrote Farquhar.